Step-by-Step Tips for Growing the Perfect Lawn in Baton Rouge
With the Spring season directly upon us, I am getting more questions than ever about lawncare, weed prevention, fertilizer, best mowing practices, and tips on everything else that leads to a beautiful yard. Whatever your specific needs entail, there are certain practices everyone should know about before tackling a lawn renovation, rejuvenation, or general maintenance.
We’re going to take a look at a few different scenarios in detail so anyone reading this can learn something useful they can carry into their own landscape.
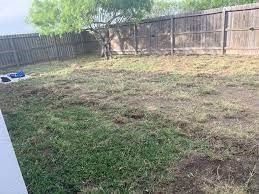 We can start with the bare-bones scenario: Let’s say you are a new homeowner with a yard in poor health similar to this image. The soil is an uneven mixture of loose dirt and packed clay – very typical in new community developments in Louisiana. Even worse, you have no idea what type of grass the previous owners used, or if they consistently used that same grass seed. This scenario can go a few different ways based on the needs or wants of the homeowner; Some people don’t really mind a patchwork of slightly different grass varieties, while others are looking to get the most level, vibrantly green, picture-perfect lawn possible. I’m sure both groups of people would want a great looking lawn if it were that simple, but it takes a lot more time, effort, and money to achieve with a standard of perfection.
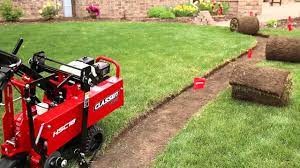 With the given information, let’s assume that your goal is to transform this yard into something that looks uniform and feels level when walking around. You also would prefer this to be done in as short a timeframe as possible. I would suggest this homeowner first and foremost remove the old sod with a sod cutter. There are both manual and gas-powered cutters, and they all do an excellent job at removing old sod as well as the first couple inches of dirt from the surface.
Once you’ve removed all the sod, it’s a good idea to inspect the yard for low points that can be filled with river silt. It’s best practice to agitate the soil with a rake before filling (I mentioned previously the soil quality of our hypothetical lawn is poor. Adding topsoil to your dirt and mixing with the clay will help new grass roots break through these obstacles).
After you feel comfortable with the level of your yard, place the new sod down (being sure to find the right variety for your area and preference). Once your sod has been placed, I always suggest some sort of lawn-starter fertilizer to improve rate of growth and root system strength. My favorite pick comes from our partners at ferti-lome pictured right.  Follow the instructions as stated, and water thoroughly within 24 hours of use.
Now that all the setup is complete, your job is to be attentive to the progress of your sod patches and to water. If you are renovating your lawn in the spring, it is often just too hot to water consistently (certain temperatures could see you watering more than once a day!). I suggest the soak approach, where you thoroughly hose the lawn to the point of the soil moving under the weight of your feet. This allows you to take 2-3 days in between watering and ensures the none of your patches become dried out.
You’ll know you’ve done the job right when the patches begin to form root connections. Eventually the dividing lines will disappear.
While I believe that is the easiest way to achieve a great looking yard in the shortest amount of time, it definitely can be a pricier option limited by your access to certain varieties of sod. A lot of the tips I mentioned in part one of this article are still applicable to sprigging or seeding your lawn, but there are key differences we will be going over today.
 Seeding Your Yard:
The first thing you’ll want to do (after you’ve decided between sodding or seeding) is to find out exactly what type of grass seed performs best in your zone, as well as planning ahead to seed your yard in the best months possible. For us in Louisiana, most of the common grasses will be warm season grasses, meaning you can go ahead and seed during the spring or summer. Louisiana Nursery does offer sod cuts (when inventory shock permits), but I have only seen centipede grass seeds in our store so far. This bag was relatively inexpensive and covers 2000 square feet.
Similar to the last article, it really is up to you how long you’re willing to wait for better results, as well as how much extra money you’re comfortable spending. If your yard needs a touch up here and there but is mostly in good health, you might just spray weeds directly and forgo the sod cutting step. Some landscapers would argue for a thorough aeration regardless of the conditions of the yard when throwing out new seed, but I’ve come to believe this is not necessary in every case. You will definitely see more of the seeds get to full germination, but that’s a decision about your own time and effort.
 Aeration is a process by which small holes are punched throughout the entirety of your yard in the hopes that seeds will be caught and start growing there. These holes provide a great spot for water to sit (increasing germination chances) as well as fertilizer to disperse.
You can always just throw out more seeds more frequently. Either way, you’ll still want to apply some sort of lawn starter fertilizer to get the roots established as quickly as possible. Multiple applications may be necessary but be sure to read the instructions carefully as over-fertilizing will either hurt the grass or waste your money.
Watering process for seeding is same as early sod, although seeds require more moist conditions to germinate. You can do this most effectively by soaking your yard thoroughly then backing off for a day or two. This water saturation should only last a few weeks but temperatures and humidity vary too widely to give an exact time frame.
Seeding your grass rather than sodding can take less tools and a smaller budget to get the same end product (some would argue even better) but you lose a lot of time doing more yard work and the payoff is further in the future. If you’ve got the patience, seeding your lawn will make anyone stand proud once the job is done!